Create Users
Learn how to add new users to DooUMS and configure their access permissions to ensure secure and efficient team collaboration.
Overview
User creation in DooUMS allows administrators to onboard team members with appropriate access levels based on their roles and responsibilities. The system supports multiple user types with customizable permissions to maintain security while enabling productive operations.
Prerequisites
Before creating users:
- You must have Admin role privileges
- Determine the appropriate role for the new user
- Have the user's basic information ready (name, email, contact details)
- Understand your organization's security and access policies
Plan user roles carefully before creation. Review the User Roles and Permissions documentation to understand available roles and their capabilities.
Creating a New User
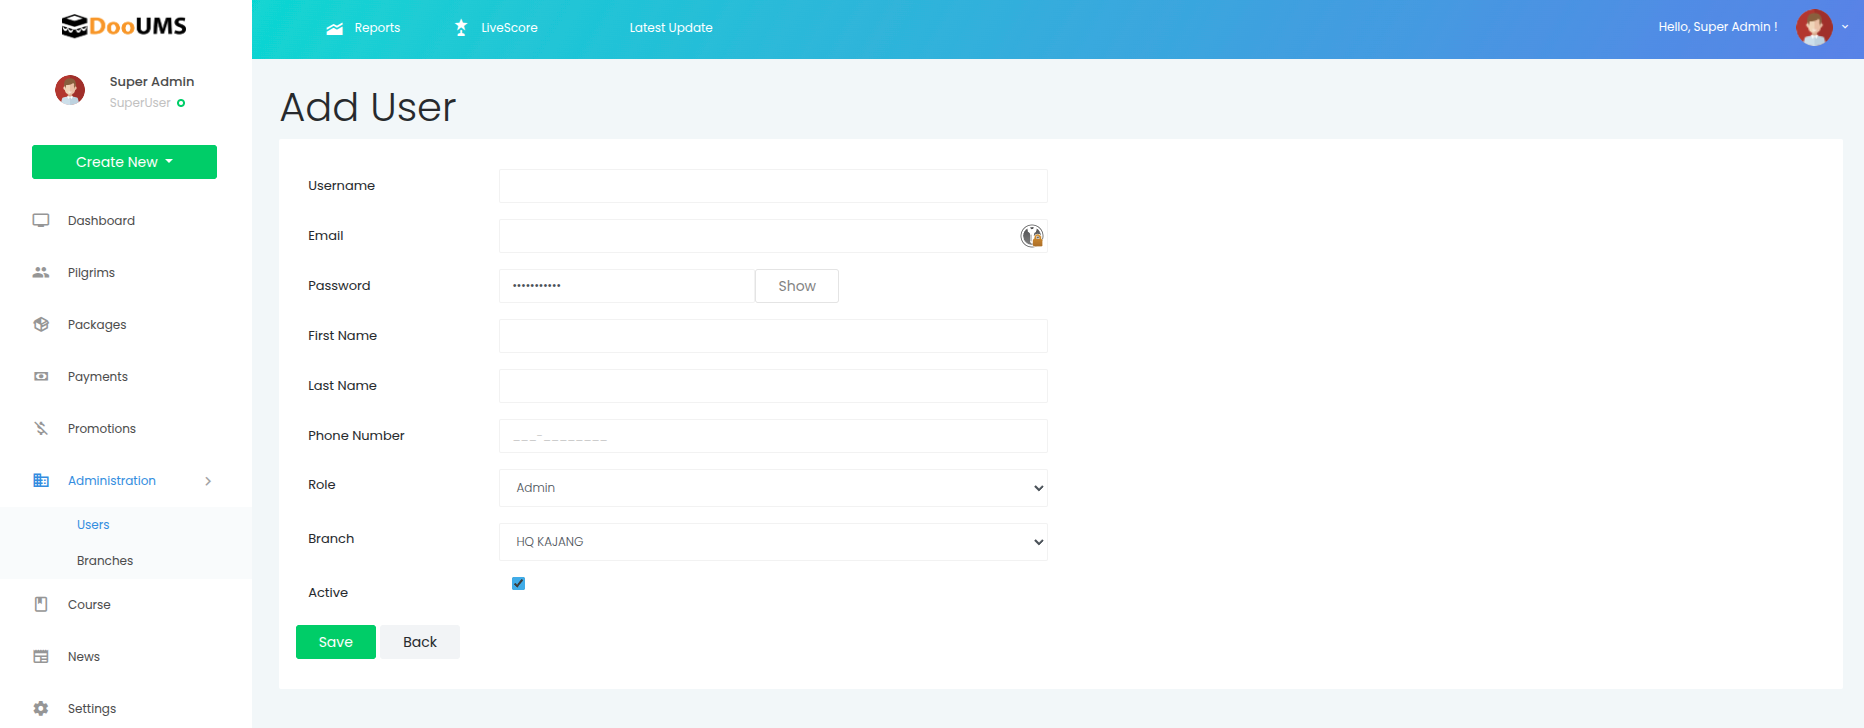
Step 1: Access User Management
- Log in to DooUMS with your admin credentials
- Navigate to Administration from the main menu
- Select Users
- Click the Add User button
Step 2: Fill in User Details
Complete the user creation form with the following information:
Account Information
- Username: Create a unique username for system login
- Email: Provide a valid email address (used for login and notifications)
- Password: System-generated password (displayed once upon creation)
- Use the show/hide toggle to view the generated password
- Copy and securely share this password with the user
The generated password is only displayed once during user creation. Make sure to copy it and share it securely with the new user. The user should change this password upon first login.
Personal Information
- First Name: Enter the user's first name
- Last Name: Enter the user's last name
- Phone Number: Add contact number for communication
Organization Settings
- Role: Select the appropriate user role from the dropdown (e.g., Admin, Agent, Operation, Finance, Staff, User)
- Branch: Assign the user to a branch location (e.g., HQ KAJANG)
- Active: Check this box to activate the user account immediately
Step 3: Assign User Role
Select the appropriate role for the new user from the dropdown menu:
- Admin: Full system access and configuration privileges
- Agent: Customer service and booking operations
- Operation: Operational management and oversight
- Finance: Financial operations and accounting functions
- Staff: General staff with limited operational access
- User: Basic read-only access for external stakeholders
Each role comes with predefined permissions. See User Roles and Permissions for detailed role capabilities.
Step 4: Review and Save
- Review all entered information for accuracy
- Verify the selected role and branch assignment
- Ensure the Active checkbox is checked to enable immediate access
- Click Save to create the user account
- Important: Copy the generated password displayed on the screen
- Click Back if you need to cancel and return to the user list
The system-generated password will only be displayed once. Make sure to copy it immediately and share it securely with the new user.
After saving:
- The user account is created and activated (if Active checkbox was checked)
- A password is automatically generated and displayed on screen
- Copy the password and share it securely with the new user
- The new user can log in using the provided username and generated password
- The user should change the password upon first login
- The user will have access based on the assigned role and branch
User Creation Examples
Example 1: Adding a Sales Agent
Scenario: Onboarding a new sales team member
Username: sarah.ahmad
Email: [email protected]
Password: (system-generated)
First Name: Sarah
Last Name: Ahmad
Phone Number: +60-12-345-6789
Role: Agent
Branch: HQ KAJANG
Active: ✓ (checked)
Result: Sarah can create bookings, manage pilgrim information, and process payments within agent limits.
Example 2: Adding a Finance Staff
Scenario: New accountant joining the finance team
Username: michael.lee
Email: [email protected]
Password: (system-generated)
First Name: Michael
Last Name: Lee
Phone Number: +60-11-987-6543
Role: Finance
Branch: HQ KAJANG
Active: ✓ (checked)
Result: Michael has full access to financial data, reporting, and payment processing.
Example 3: Adding Read-Only User
Scenario: External partner needs view-only access
Username: john.tan
Email: [email protected]
Password: (system-generated)
First Name: John
Last Name: Tan
Phone Number: +60-13-456-7890
Role: User
Branch: External Partners
Active: ✓ (checked)
Result: John can view assigned bookings and documents but cannot make modifications.
Post-Creation Tasks
After creating a user account:
1. Verify Account Creation
- Confirm user appears in the user list
- Verify role and branch assignment are correct
- Check that the Active status is enabled
- Ensure you have saved the generated password securely
2. Initial Setup
- Share Credentials: Securely provide the username and generated password to the new user
- First Login: Have the user log in and change their password immediately
- Profile Setup: Guide user to complete their profile information
- Training: Provide role-specific training and documentation
3. Access Testing
- Verify the user can access appropriate modules
- Test permissions to ensure proper restrictions
- Confirm no unauthorized access to restricted features
4. Documentation
- Record user creation in your organization's documentation
- Update team directory and contact lists
- Note any special permissions or restrictions
Common Scenarios
Temporary Access
For contractors or temporary staff:
- Create user account with appropriate limited role
- Uncheck the Active checkbox when the user's access period ends
- Monitor access during temporary period
- Deactivate account by editing the user and unchecking Active
Bulk User Creation
For onboarding multiple users simultaneously:
Bulk user creation requires administrative support. Contact Dabudoo Technology support team for assistance with importing multiple users from CSV or Excel files.
Role Changes
To change a user's role after creation:
- Navigate to Administration → Users
- Find and select the user
- Click Edit or select the user
- Change the role from the dropdown
- Click Save to apply changes
Changing user roles immediately affects their system access. Inform users before making role changes to avoid disruption.
Security Best Practices
Password Policies
- System generates secure passwords automatically
- Require users to change password upon first login
- Enforce strong password requirements for user-created passwords
- Require password changes every 90 days
- Prevent password reuse (last 5 passwords)
- Lock accounts after failed login attempts
Access Management
- Follow principle of least privilege
- Regularly review user access levels
- Uncheck Active for inactive users to disable accounts
- Remove access immediately upon employee departure by deactivating their account
Audit and Monitoring
- Review user creation logs regularly
- Monitor login activities for anomalies
- Track permission changes and modifications
- Maintain audit trail for compliance
Troubleshooting
User Cannot Login
Problem: New user unable to access system
Solutions:
- Verify username and password are correct
- Check if the Active checkbox is enabled for the account
- Confirm role and branch assignment completed successfully
- Ensure the user is using the correct login credentials
Permission Issues
Problem: User sees "Access Denied" messages
Solutions:
- Verify correct role is assigned
- Check if specific permissions need adjustment
- Contact admin to review permission settings
- Consider if custom role is needed
Related Documentation
- User Roles and Permissions - Detailed role capabilities and permission matrix
- Settings Overview - General system configuration and settings
Need Help?
If you encounter issues or need assistance with user creation:
- Review this documentation thoroughly
- Check the troubleshooting section above
- Contact Dabudoo Technology support team
- Visit the support portal for additional resources
Admin Access Required | Email Required | Role Selection Mandatory | Welcome Email Sent Automatically